Since this is a cheap frame, I should have thought not all screws will be provided. It did not have any screws for the motor, luckily I had 8 spare... but I needed 16. I went to 2 hardware store and 1 auto store, none of them has a M3 that is 6mm short. I am glad my neighbour has heaps of RC parts, as he used to own a hobby shop and still has a few planes of his own.
The Pixhawk FC is a open source hardware and software platform. Much like Linux before, there are lots of loose documentation. I almost bricked my FC after 2 failed firmware updates. Also did not realise there are 2 different firmware for it.
I have got also some failed parts, which I did not order extra parts on. 1 of the ESC has failed, must be dud... or I smoked it after a few mins. Wrong firmware on the FC perhaps. The safety switch LED also does not work.
Anyway ordered the failed parts and I need to start reading more about the Pixhawk.. maybe next week things will all work and go as planned.
Tuesday, October 28, 2014
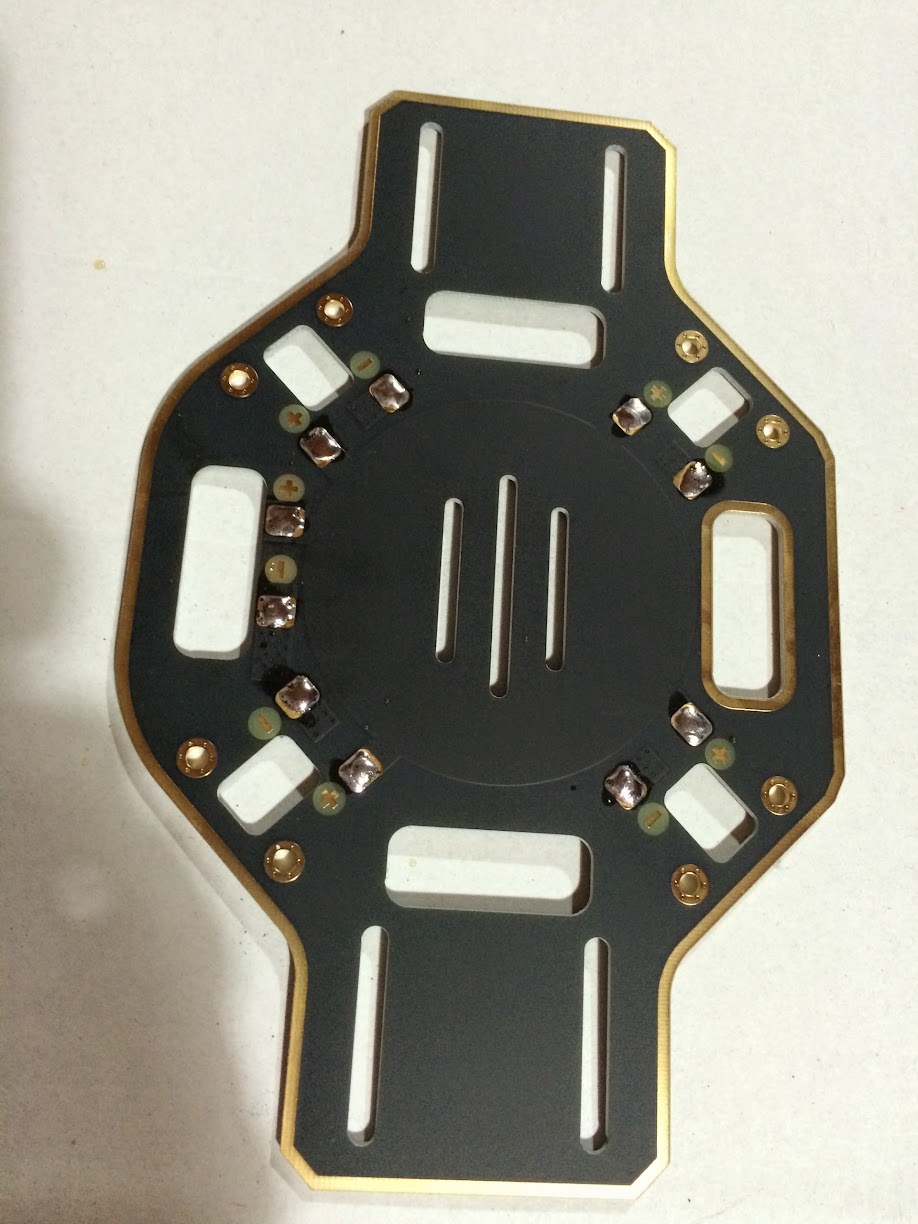
Building a cheap quad. Step 4: Put together the top and bottom plates of the Reptile V550
After a lot of trial and error, hand gymnastics... surprisingly all the electronic parts fit when I sandwich the top and bottom plates together. This is not a kit, no instructions and I had no idea everything will fit.
The bottom plate main consist of the flight controller, receiver. While the toplate has the power distribution board, gimbal board. As you can see on the photos the flight controller has only a few mm to room to spare.


The bottom plate main consist of the flight controller, receiver. While the toplate has the power distribution board, gimbal board. As you can see on the photos the flight controller has only a few mm to room to spare.
Building a cheap quad. Step 3: Setup the HK Pilot32 (Pixhawk clone) Flight Controller (FC)
I always wanted to have a Pixhawk FC, but I am on a budget. So a clone of it, the HK Pilot32 will do
I did not realise there where a few choices for ground station software and firmware. I initially used qgroundcontrol and flashed the firmware. The 1st flash failed, gladly a 2nd flash worked. I went through some calibration steps, some of the documentation is a bit outdated. To matters worse I did not realise that there are different ground station software and firmware, so doing a google on pixhawk may give you links to different ones. Example there are a slight variation from the qgroundcontrol and APM mission planner buzzer/beep codes.
My safety switch LED light also is not working.
Building a cheap quad. Step 2: Wire in Motors and Electronic Speed Control (ESC)
I screwed on the motors, being a cheap frame it does not come with screws. You will need an extra 16pcs of M3x6mm. Luckily I had some spares, but only 12 pcs. For now I only have 3 screws per motor. While I was busy using zip ties for the cables, my daughter was also busy using zip ties for some art. I had to also move the PDB lower, as my ESC cables on the rear is too short.


Building a cheap quad. Step 1: Mount the power distribution board (PDB) to the Reptile V550 (v2) frame
The Reptile V550 (v2) is a cheap frame, so it does not have any instructions. Luckily the PDB just fits enough the top frame after a few trial and error of using different screws and mounts. I used a M3 screw and a nut, I also eventually lowered it a bit later from this photo to accommodate the gimbal board.
Also pictured here is side by side comparison with my current DJI F450 arms. The cheaper one is not as white and narrower, it seems to be just as stiff though.


Also pictured here is side by side comparison with my current DJI F450 arms. The cheaper one is not as white and narrower, it seems to be just as stiff though.
Starting to build a cheap but good quad copter
I decided to build a cheap but good quad copter. My initial target is cost 1/2 or less of my current dji F450 with a E300 propulsion system. And it must be just as good or better.
The 2nd quad will serve more as a FPV and UAV platform. I ended up with the following parts:


- Reptile 550 v2 with 1 axis gimbal ($66). This is a TBS Discovery clone, which should be good for FPV and shares arms with F450, motors, esc for sharing spares.
- Multistar 2212/920kv ($45). So I can share/use the DJI 9443 and 9450 props. I also like the easy off and on of the self locking props. I wanted a Sunnysky 2212/980kv but it seems I can't use the self locking props on it w/o the rare adapter. Another E300 set is too expensive, I can however move the E300 to it.
- Multistar 20A BLHeli ESC ($10 x 4). Initially wanted a simonk based ESC such as the Afro. I read there where a few issues especially for a Pixhawk flight controller. So I opted for the BLHeli ESC.
- HK Pilot32 ($130). Always wanted a Pixhawk, I want to do some UAV and possibly coding but could not afford a 3D Robotics made one.
- Ublox Neo 7m GPS ($34)
- Minim OSD ($21). Will do more FPV, so I guess OSD is now a must.
- power distribution board ($4). Reptile V550 does not have a built in distribution board unlike a TBS Discovery.
- Nanotech apec g2 ($56)
- Walkera RX703a ($29). I have a walkera radio, as I share it flying the F450, Ladybird and Master CP. The RX703a also use PPM signal which works for the Pilot32
Sunday, October 5, 2014
Final adjustment and testing of gains for dji F450
Having added the FPV I needed to adjust the gains. Increased the pitch and roll a bit so it can handle the wind better. Lowered the Altitude pitch and roll as it seems to make it less jerky. Significantly increased the vertical, so it would not descend when moving.
Basic
150% Pitch 150% Roll 120% Yaw 200% Vertical
Altitude
110% Pitch 110% Roll
I tested the gains on a very windy condition in atti mode.
Final testing and adjustments. Wellington strong winds is the best place to give it a real world test. Not brave enough to go over water though, gust can really take the quad down as seen on one of the crash.
Sunday, September 21, 2014
Wiring up some First Person View (FPV) video feed
Been busy for the past few weeks, today it was rainy. So I finally got the shipped items to make my initial FPV. It was pretty straight forward, some wiring and soldering.
I opted to get a basic 5.8ghz system for now. This should be good for 500-1000m range with clear line of sight, from what I read. Need to test/verify this on a good day.
I am still using a Mobius camera. I got the Mobius video cable which goes from the USB port of the camera to the video transmitter (VTX). The pins of the Mobius video cable is a direct match for the Boscam TS351. No soldering required, just don't use the Boscam cable and directly fit the mobius video cable (yellow-black).
To power the VTX I opted to use my main battery. I currently use a 3S LIPO battery, so I did not need to step down the voltage. I only used a Fat Shark power filter. Take note its important to reverse the wire polarity of the Fat Shark power cable, as the Boscam positive and negative terminals are the other way around of the Fat Shark. I then just cut and soldered a splitter on the balance cable of the 3S battery.
My ground station video receiver (VRX) is still very basic. I just opted to get a 7" monitor, will just get some goggles sometime in the future. Some soldering and wiring was done. I made a simple JST plug to 2.1mm adapter for the power. Got some RCA male to male adapters. Also made a simple JST splitter. The 500mah 3S Lipo seems to last for about 45 mins or more, enough for my current flight times.
Perhaps the more fun project is fitting the Ladybird with a 808 #16 keychain camera. The 808 is a 720p HD camera. The little bug seems to fly with this heavy payload for a good 3 mins, using only the stock 280mah battery. I got some 360mah battery coming. This little bug will really give some good fun for my daughter.
Monday, August 11, 2014
Some tweaking of the quad after some flights
I have updated my settings after a few flights.
Cut the extended legs a bit, as the stock dji extended legs are too tall and bouncy. Even the RTH can't land the quad without it falling over.
I have also change my gains to make it less wobble. Current gains are:
Basic
145% Pitch 145% Roll 140% Yaw 120% Vertical
Altitude
140% Pitch 145% Roll
I have also mapped the IOC to X2 using the FMOD switch.
first level 10.6v 0.20v 10.40v
second level 10.20v 0.20v 10.00v
Some flights of it:
Cut the extended legs a bit, as the stock dji extended legs are too tall and bouncy. Even the RTH can't land the quad without it falling over.
I have also change my gains to make it less wobble. Current gains are:
Basic
145% Pitch 145% Roll 140% Yaw 120% Vertical
Altitude
140% Pitch 145% Roll
I have also mapped the IOC to X2 using the FMOD switch.
| Naza Lite | Walkera Devo RX1002 | Walkera Devo 10 |
|---|---|---|
| A | AILE | Aileron (reverse) |
| E | ELEV | Elevator |
| T | THRO | Throttle |
| R | RUDD | Rudder (reverse) |
| U | AUX1 | Flap/Mix (trim U 84.5% D 84.5% subtrim U 5.5%) |
| X1 | AUX4 | Aux4 |
| X2 | AUX2 | Fmod (reverse trim U 90% D 90%) |
Also changed the failsafe voltage to be higher on first level:
first level 10.6v 0.20v 10.40v
second level 10.20v 0.20v 10.00v
Some flights of it:
Friday, August 1, 2014
Done the finishing touches, quad is ready to fly
I have setup the Flight Controller FC, Radio Control RC, mount a Mobius action camera and legs. Got all the functionality mapped on the FC. It should switch to different flight modes, GPS, Altitude hold and manual. I setup the failsafe switch so it would go back to its take off point when it looses radio signal or on flip of a failsafe switch.

Basic / GPS Mount
X -2cm
Y -4cm
Z 12cm
Also my GPS puck on the quad is rotated about 10 degrees towards the right. This is to compensate for the magnetic declination. See manual on Toilet Bowl Effect.
Basic / RC - I have used the default settings on DEVO 10 where all channels are normal. I then setup the NAZA with the following:
A - Reverse
E - Normal
T - Normal
R - Reverse
165 Pitch 165 Roll 150 Yaw 150 Vertical
Altitude 100 Pitch 100 Roll
Assign X1 and X2 to which one I wanted to adjust. I then set the DEVO 10 trims and sub trim so the gain % difference is not big.
Aux4 Trim U40% D40% sub trim +7.0%
Aux5 Trim U40% D40% sub trim +12.0%
first level 10.5v 0.20v 10.30v
second level 10.20v 0.20v 10.00v
Unfortunately I can't fly it over the weekend, there is bad storm. Its very gusty and raining hard.
Here are some details of my initial setup:
Wiring between FC and RX
| Naza Lite | Walkera Devo RX1002 |
|---|---|
| A | AILE |
| E | ELEV |
| T | THRO |
| R | RUDD |
| U | AUX1 |
| X1 | AUX4 |
| X2 | AUX5 |
Naza Lite Assistant Settings and DEVO 10 settings to make them work
DEVO 10 is setup in airplane modeBasic / GPS Mount
X -2cm
Y -4cm
Z 12cm
Also my GPS puck on the quad is rotated about 10 degrees towards the right. This is to compensate for the magnetic declination. See manual on Toilet Bowl Effect.
Basic / RC - I have used the default settings on DEVO 10 where all channels are normal. I then setup the NAZA with the following:
A - Reverse
E - Normal
T - Normal
R - Reverse
The flight modes is controlled by the Mix switch (labeled as Flap on airplane mode). For the U channel to set on the correct areas (GPS, Atti, and Manual) I have set following on the DEVO 10
Trim / Flap U 84.5% D 84.5%
Sub Trim / Flap U 5.5%
I then used the Gear switch, to move U channel into the fail safe zone. I used a program mix to achieve this.
Program Mix 1
Sub Trim / Flap U 5.5%
I then used the Gear switch, to move U channel into the fail safe zone. I used a program mix to achieve this.
Program Mix 1
master: Gear
slave: Flap
Pos 0(+) -50%
slave: Flap
Pos 0(+) -50%
I have also the DEVO 10 failsafe to move the flaps should the radio loose signal
Failsafe flap U50%
I also set the "Fixed ID" binding, its needed so that when the radio signal is re-established you can take control again. Otherwise you will need to power down the transmitter and receiver again to bind it.
Failsafe flap U50%
I also set the "Fixed ID" binding, its needed so that when the radio signal is re-established you can take control again. Otherwise you will need to power down the transmitter and receiver again to bind it.
For the gains I have used Aux4 and 5 knobs to adjust it. Here are my initial parameters:
Altitude 100 Pitch 100 Roll
Assign X1 and X2 to which one I wanted to adjust. I then set the DEVO 10 trims and sub trim so the gain % difference is not big.
Aux4 Trim U40% D40% sub trim +7.0%
Aux5 Trim U40% D40% sub trim +12.0%
My initial failsafe voltage:
first level 10.5v 0.20v 10.30v
second level 10.20v 0.20v 10.00v
Wednesday, July 30, 2014
Wiring in the brain of the quad
Today just wire in the Flight Controller (FC) and receiver. Hooked it up on the computer and transmitter for the initial setup. So far things are connected properly


Finally tidy up the wires, mount the top deck and the GPS.
Next will be setting up the FC and GPS properly.
More bits going into the quad, its taking shape
Today a few more parts arrived. Soldering is finished, done the battery terminal and power management unit (PMU). I have also used clear silicon to insulate the soldered joints.

Mounted the motors, arms and propellers. Its now taking shape.


Mounted the motors, arms and propellers. Its now taking shape.
As a distraction, I have put in the trainers on the heli. I have also stripped and replaced the battery terminal to be a XT60.
Tuesday, July 29, 2014
Some parts have arrived and got my hands started in building a quadcopter
Some parts turned up today to build my quadcopter, the F450 frame box was damaged.

All the parts seem to be in good physical order despite the damage on the box. Below are the contents of a F450 frame kit, E300 propulsion system, Naza lite and legs.

Got my hands started after doing my usual stuff. My kids kinda help me a bit.

Got the soldering iron out and tinned the lower deck, which also serves as the power distribution board.
After smelling some lead from the solder and mustering out my basic soldering skills, I got all 4 Electronic Speed Controllers (ESC) done.

I need to stop here, as it late and I also did not have all the parts yet. Hopefully some are coming tomorrow. Oh here is a photo of the cheap 10 channel transmitter that comes with a Heli... hehehe.

Figuring out what quad copter to build
There are a lot of quad copter to build, lots of different choices. My initial object for the build are:
- Medium range (500m to 1000m) Aerial Photo (AP)
- Basic First Person View (FPV) flying
These are my nice to have next objectives:
- Long range (1km to 2km) AP
- Full experience FPV
- Unmanned Autonomous Vehicle (UAV) aka Drone
- Night flying
- Commercial application of UAV
- Drone to drone communication to choreograph manoeuvres of a fleet of drones
Ok lets get back to more basic attainable objectives. I have short listed it into 2 platforms:
- DJI based quadcopter
- 3D Robotics based quadcopter
Both have their strength and weaknesses. I like the 3DR platform, as it based on open source and open hardware. There platform is also more aligned to my nice to have objects. The DJI products however based on research is more polished and a popular choice. Its kinda like the difference between an Android phone and iPhone. I use both phones, and there is no clear winner.
Then there is a 3rd option is combine both, use a DJI frame, motors, propellers and 3DR Flight Controller (FC), GPS, compass. This is the ideal combination for me, I have seen also a few people gone through this route.
I have finally decided to build a DJI based quadcopter, then eventually move to a 3DR FC. Using a DJI based quadcopter seems to be a more safer choice as this will be my first real quad and flying rc at the same time. Once I understand better on how things work, then I move to a more custom quad.
Since I will be moving to a 3DR FC, I only bought a DJI Naza lite FC to keep the cost down. The frame would be a DJI F450 Flamewheel as it a pretty versatile platform. I will couple it with a DJI E300 propulsion system.
useful links:
http://www.quadcoptersarefun.com/
http://3drobotics.com/
http://www.dji.com
http://www.rcgroups.com/forums/showthread.php?t=2072672
http://vimeo.com/86967008
For the transmitter I wanted to have a Futaba one, as on my RC cars I used Futaba controllers. The Futaba controllers cost a lot. So looked around and found that the cheap ones are just as good like the FrSky Taranis 9XD. Although I ended up getting a Walkera Devo 10; as it was cheaper, good enough and it can control a few Walkera helis that where pretty good. So I ordered a Devo 10 that came with a Walker Master CP helicopter, this is how I sold it my wife: "I need a transmitter, hey if I add $50 more I get to have a nice heli!"
Dreaming to Fly, make it real by building a quadcopter
Since I was a kid, I always wanted to fly a plane and helis. Wasn't able to do it... yet. The closest way for me to experience this is use a computer and flight simulator games. Fast forward today while I was buying some parts for my RC cars which I play with my kids, I saw an AR Drone 2.0 on sale. So I decided to buy it. The rational behind it: its not too expensive and if I don't get to have enough interest and time its a ready-to-fly (RTF) product. The kids can use the AR Drone 2.0 without much fuss.

The AR Drone 2.0 was a pretty good starter quadcopter. Here are some actual videos of it:
The AR Drone 2.0 was a pretty good starter quadcopter. Here are some actual videos of it:
Now sold the AR Drone 2.0 and decided to move into more serious quads. I wanted longer range, better stability against strong winds.
Hopefully I can make a short series of post as I build a quadcopter. This should be helpful for me as my notes on how I built it and if anybody is interested to do the same thing.
Saturday, April 19, 2014
Building opencv java module
Last week I tried to build OpenCV java module so I could use it for clj-drone so I could have more fun with AR Drone 2.0. I couldn't figure out why the java module is set unavailable after cmake. This happens on both Ubuntu 12.04 and OS X 10.9. I have seen some issues regarding properly setting the JAVA_HOME and the cmake JNI file being incorrect. I tried to look at this angle, seeing why the JNI interface would not work.
However it seems "ant" is a required component and not just a recommended install as indicated by the docs. So after a "brew install ant" and "apt-get install ant" cmake is able to properly set the Java OpenCV module. I never had ant for years in my system, right now only using mvn, sbt and lein.
OpenCV 2.4.5 built just fine on Ubuntu, OSX seems to be having some c++ compile issue...
Thursday, April 3, 2014
Learning Clojure by doing a simple things
I usually tinker around different languages or technology. I have been learning a bit of Clojure for the last couple of weeks. Tried it at the office, by making a simple REST client. Now just making a simple web app, just to get a feel of the language and ecosystem around it.
Clojure reminds me of Tcl, I know its LISP and it should remind more of emacs. It reminds me of Tcl as I done a lot of Tcl programming using aolserver and OpenACS before. Unlike the first few times I used Ruby or Scala, where the first wow factor is the language. Tcl and Clojure the wow factor is getting to do something really quick. They both have quirky syntax, but simple and uniform.
Here is why I am learning Clojure:
It starts with a macro for defining an entity and I would guess the convention to tie with the backing rdbms tables. Then you define some functions using Korma's sql dsl. You deal with primarily 2 data structure "id" which is a string and "product" which is a map.
Web using Ring and Compojure
The above is defining the routes, which you tie to the application handler. Real nice bits are the ability to define a context. Which would mean enclosing routes will start with that path first. Easy way to extract the request body from a key ":body-params", and to respond with body by setting the key ":body".
Finally the front end using Clojurescript, Gyr and Angular.js
It looks less Clojure idiomatic, however I wanted to start somewhere. Angular.js is familiar to me, just realised that its been about 2 years ago I started looking at Angular.js. We have been using it ever since, I am actually rusty on it already. I saw the Gyr and Putnam project had pretty good documentation. Gyr gives some macros such as def.factory, def.controller, etc. which looks similar to normal angular. Then the ability to use $scope.foo.bar which is pretty nice. You will need to use "obj" and "arr" to interact with normal Javascript objects and arrays.
Clojure is nice and simple (still on first impression). Gets you up and running quick. If its good for long big projects, I don't know yet. However I will be happy if I can meet 2 out of my 3 objectives in learning Clojure. Complete source code here for the curious.
Clojure reminds me of Tcl, I know its LISP and it should remind more of emacs. It reminds me of Tcl as I done a lot of Tcl programming using aolserver and OpenACS before. Unlike the first few times I used Ruby or Scala, where the first wow factor is the language. Tcl and Clojure the wow factor is getting to do something really quick. They both have quirky syntax, but simple and uniform.
Here is why I am learning Clojure:
- Learning a new languages makes me better at the languages I already know. Getting the nice feeling of being new, and learning a lot on the way... mistakes and aha moments.
- Still on my journey to be a better Functional Oriented hipster. Not that I am leaving Object Oriented or even procedural away, just learning a another way of thinking and solving computing issues.
- Getting my son to learn something. Clojure seems to have nice abstraction for sql, web and js. Start with 1 language will be less intimidating, instead of learning a lot in 1 bang.
As a newbie, I started with a framework first. I like get to know other people's opinion first before making my own. I picked Luminus as it seem to be using some of things that the clojure community is using. Here are some code snippets from bottom layer to top. Its simple and lacks any real world complications yet, learn the ropes on the basic things first.
It starts with a macro for defining an entity and I would guess the convention to tie with the backing rdbms tables. Then you define some functions using Korma's sql dsl. You deal with primarily 2 data structure "id" which is a string and "product" which is a map.
Web using Ring and Compojure
The above is defining the routes, which you tie to the application handler. Real nice bits are the ability to define a context. Which would mean enclosing routes will start with that path first. Easy way to extract the request body from a key ":body-params", and to respond with body by setting the key ":body".
Finally the front end using Clojurescript, Gyr and Angular.js
It looks less Clojure idiomatic, however I wanted to start somewhere. Angular.js is familiar to me, just realised that its been about 2 years ago I started looking at Angular.js. We have been using it ever since, I am actually rusty on it already. I saw the Gyr and Putnam project had pretty good documentation. Gyr gives some macros such as def.factory, def.controller, etc. which looks similar to normal angular. Then the ability to use $scope.foo.bar which is pretty nice. You will need to use "obj" and "arr" to interact with normal Javascript objects and arrays.
Clojure is nice and simple (still on first impression). Gets you up and running quick. If its good for long big projects, I don't know yet. However I will be happy if I can meet 2 out of my 3 objectives in learning Clojure. Complete source code here for the curious.
Subscribe to:
Posts (Atom)